Diferencia entre revisiones de «Skycube: Mounting the battery pack»
(→Paso 3: Estañear los cables) |
|||
| Línea 1: | Línea 1: | ||
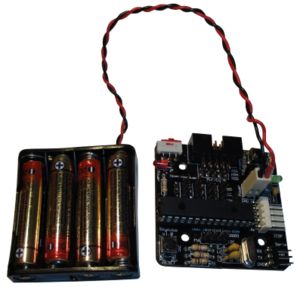
| − | [[Imagen:Portapilas-skycube-test1.jpg|thumb|300px|Battery pack ready to use with the Skycube board. Four AAA batteries are needed]] | + | [[Imagen:Portapilas-skycube-test1.jpg|thumb|300px|Battery pack ready to use with the Skycube board. Four AAA batteries are needed (''Click to enlarge'')]] |
== Introduction == | == Introduction == | ||
| Línea 12: | Línea 12: | ||
{| {{tablabonita}} | {| {{tablabonita}} | ||
| − | | [[Imagen:Portapilas-skycube-inicio.jpg|thumb|250px|'''Beginning'''. Parts needed to mount the battery]] | + | | [[Imagen:Portapilas-skycube-inicio.jpg|thumb|250px|'''Beginning'''. Parts needed to mount the battery (''Click to enlarge'')]] |
| − | || [[Imagen:Portapilas-skycube-final-r2.jpg|thumb|250px|'''End'''. The battery pack is ready to use with the Skycube board]] | + | || [[Imagen:Portapilas-skycube-final-r2.jpg|thumb|250px|'''End'''. The battery pack is ready to use with the Skycube board (''Click to enlarge'')]] |
|} | |} | ||
| Línea 25: | Línea 25: | ||
{| {{tablabonita}} | {| {{tablabonita}} | ||
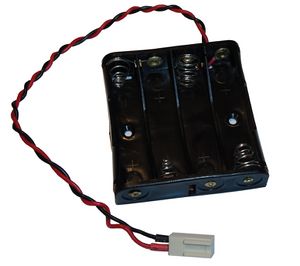
| − | | [[Imagen:Portapilas-skycube-paso-1.jpg|thumb|250px|The battery pack with the twisted wires]] | + | | [[Imagen:Portapilas-skycube-paso-1.jpg|thumb|250px|The battery pack with the twisted wires (''Click to enlarge'')]] |
|} | |} | ||
| Línea 32: | Línea 32: | ||
{| {{tablabonita}} | {| {{tablabonita}} | ||
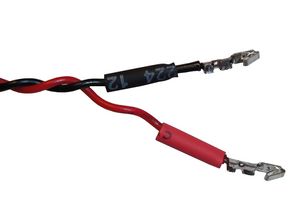
| − | | [[Imagen:Portapilas-skycube-paso-2.jpg|thumb|250px|The heat shrink tubes in the wires]] | + | | [[Imagen:Portapilas-skycube-paso-2.jpg|thumb|250px|The heat shrink tubes in the wires (''Click to enlarge'')]] |
|} | |} | ||
| Línea 41: | Línea 41: | ||
{| {{tablabonita}} | {| {{tablabonita}} | ||
| − | | [[Imagen:Portapilas-skycube-paso-3.jpg|thumb|250px|Wires with solder]] | + | | [[Imagen:Portapilas-skycube-paso-3.jpg|thumb|250px|Wires with solder (''Click to enlarge'')]] |
|} | |} | ||
| − | === ''' | + | === '''Step 4''': <font color=blue>Apply solder in the molex male pins</font> === |
| − | + | Apply solder in the molex male pins. Just a little bit in the base is enough. | |
{| {{tablabonita}} | {| {{tablabonita}} | ||
| − | | [[Imagen:Portapilas-skycube-paso-4.jpg|thumb|250px| | + | | [[Imagen:Portapilas-skycube-paso-4.jpg|thumb|250px|Pins with solder (''Click to enlarge'')]] |
|} | |} | ||
| − | === ''' | + | === '''Step 5''': <font color=blue>Solder the pins to the wires</font> === |
| − | + | Solder the pins to the wires. Use a flat nose plier for holding the pin. Bring the wire near the pin and apply heat with the soldering iron. As both the pin and cable have solder their soldering will be done very easily. | |
{| {{tablabonita}} | {| {{tablabonita}} | ||
| − | | [[Imagen:Portapilas-skycube-paso-5.jpg|thumb|250px| | + | | [[Imagen:Portapilas-skycube-paso-5.jpg|thumb|250px|Wires with soldered pins]] |
|} | |} | ||
Revisión del 09:53 19 feb 2011
Contenido
- 1 Introduction
- 2 Mounting
- 2.1 Step 1: Twist the wires
- 2.2 Step 2: Insert the heat shrink tubes
- 2.3 Step 3: Estañear los cables
- 2.4 Step 4: Apply solder in the molex male pins
- 2.5 Step 5: Solder the pins to the wires
- 2.6 Paso 6: Aplicar calor al termoretráctil
- 2.7 Paso 7: Insertar los cables en el conector molex
- 2.8 Paso 8: Poner 4 pilas AAA
- 3 Pruebas
- 4 Fotos
- 5 Enlaces
- 6 Noticias
Introduction
To power the electronics (Skycube board) a flat battery pack of 4 AAA is used. It can be connected to the molex connector on either sides of the board.
The parts needed are the following::
- A flat battery pack, for 4 AAA batteries
- A two-pin female molex connector
- Two pins for the molex connector
- Two pieces of heat shrink tube. Diameter: 2mm. Length: 10mm
Mounting
Step 1: Twist the wires
Twist the battery pack wires. It is optional, but it is recommended to do it. The resulting wire is more compact and resistent. In addition it will easier to wire the robot.
Step 2: Insert the heat shrink tubes
Insert the heat shrink tubes in both wires, as shown in the figure. Do not apply heat still.
Step 3: Estañear los cables
Use the soldering iron to apply solder in both wire ends. This will make easier to solder the male molex pins
Step 4: Apply solder in the molex male pins
Apply solder in the molex male pins. Just a little bit in the base is enough.
Step 5: Solder the pins to the wires
Solder the pins to the wires. Use a flat nose plier for holding the pin. Bring the wire near the pin and apply heat with the soldering iron. As both the pin and cable have solder their soldering will be done very easily.
Paso 6: Aplicar calor al termoretráctil
Colocar los tubos termo-retráctiles de manera que cubran la mitad inferior de cada pin. Usando la parte ancha del soldador, aplicar calor. El termo-retráctil, además de prevenir cortocircuitos, le da más consistencia a la unión y evita que se rompa.
Paso 7: Insertar los cables en el conector molex
Insertar los pines macho en el conector molex hembra. ¡¡¡ATENCIÓN A LA POLARIDAD!!!. El cable rojo se debe introducir en el pin 1 del molex. Para insertarlos puede ser necesario utilizar unos alicates de cabeza plana. Si el pin macho no entrase bien, usar estos alicates para presionar el pin, aplastando un poco las partes que no entren. Una vez que el pin entra, se oirá un pequeño 'click' y al tirar del cable ya no se podrá sacar.
Paso 8: Poner 4 pilas AAA
Finalmente colocar las 4 pilas AAA. El portapilas está listo para ser probado.
Pruebas
- Conectar el portapilas al conector de alimentación superior de la Skycube
- Encender la skycube, mediante el interruptor. El led rojo se debe encender.
- Conectar el portapilas al conector de alimentación de la cara inferior. El led rojo también se debe encender.
Fotos
| Álbum de fotos |
Enlaces
Noticias
- 21/Enero/2010: Primera versión de esta página
- 20/Enero/2010: Comenzada esta página


